

Nami mill is back with a bit of upgrade. Well it is up to you if you want to use the OP09 stuff in the deck. Personally, the deck is good at it is as I doubt we would get more insane support for Nami mill. Although I am still playing with this deck still and see how I could increase the mill speed, since this deck loses to big beat stick and rush builds as we need to take the time to set up.
OP09 Nami |
|---|
Leader Character (18) Event (32) |

How it Works?
I've kept most of the old cards since this deck works the best with old cards where we focused on drawing and milling cards. The only new card is OP09 Nami who let us search for Blue event cards. Personally, I think she is very useful as it will let us search the Events we need to increase the speed of decking out. I've also made this a defensive build, as non of our Event counters cost 0 to play so we could easily ran out of DONs if we don't have Blockers. Apis can search one of the Blockers from the deck.
Basically, if you can stall out the game as long as possible, you will have the advantage. So you don't want to hit your opponent's Leader, just try and remove your opponent's Characters with Nami Leader. This will increase the chances of the more cards you draw, and drawing is always good for this deck. We don't really have a lot of mill cards in this deck, since Bandai doesn't want to make this deck broken, and some of the mill cards have high cost. We need DONs to play counters, so I can't really risk running high cost mill Characters in the build.
The Mill


As for the mill cards, these 3 are the mill of the deck. Mill increase the chance of decking out as well as combining with draw power. Boodle is a Blocker with an on KO effect, mill 1 card. So even if your opponent does KO Boodle, we still get the mill which is what I mainly need for this deck. Rubber Band of Doom is an Event Counter, the counter effect is your Leader or 1 of your Characters gains 2k power this battle. Then, you may trash the top card of you deck. The trigger effect is draw 1 card and you may trash the top card of your deck. Both effects will be very handy when we want to mill ourselves to win.
Giant Gavel is another very handy mill card we want to use. The counter effect is you may trash 1 card from your hand, 1 of your Leader gains 4k power this battle. Then, you may trash 2 cards from top of your deck. The trigger effect is kinda disappointing compare to Rubber Band, the effect is return one 4 cost or less Character to the owner's hand. Do note that Gavel only powers up your Leader, if your opponents decided to attack your Characters, we will need to use other cards.
Draw


The more we draw, the chances of milling our deck will be quicker. This is where these cards are very useful for the build. OP03 Kaya works on play, draw 2 cards and trash 2 cards. The thing with Kaya, we've only got few cards we could discard, but the rest of the cards will be very important. I guess it also depends on your hand size. If you have low hand size, then you kinda don't want to discard unless you know you can deck out.
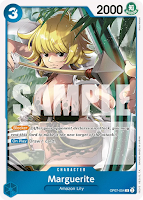
Marguerite is a Blocker, so we have 2 Blockers in this build to stop your opponent's attacks and don't need to waste DONs to burn up all the Event Counters from our hand. The on play effect is draw a card. The only downside to Marguerite is that she has 0 counter, so if you draw her at the wrong time where you need counters, it can cost you the game.
White Snake is a 2 drop Event Counter, the counter effect is your Leader or 1 of your Characters gains 1k power until end of turn, and draw 1 card. The 1k bonus until end of turn will be very handy especially when your opponents have 5k beat stick on the field. They will need to use up a DON to hit some magic numbers against your Leader. The trigger effect is okay, look at the top 5 cards of your deck and place them on top or bottom of your deck in any order. I do prefer using the counter effect as every little draw will help in decking out and triggering Nami's win condition sooner.
Love Love Mellow is another 2 drop Event Counter, however, this card works best if your have low hand size. The counter effect is your Leader or 1 of your Characters gains 4k power this battle. Then, if you have 3 or less cards in your hand, draw 1 card. Well if you do end up drawing Mellow whilst you have big hand size, you might need to discard 1 of the copies in order to make use of some of your effects.
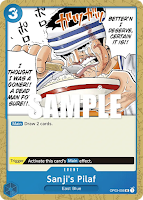
Sanji's Pilaf is basically the Pot of Greed of the deck. The main effect is draw 2 cards, and the trigger effect is just activate this card's main effect. To be honest, costing 3 to play Pilaf is a lot, and I really want to aim for the trigger effect instead, since we need to use every DONs we can for the Events.
Searchers


Searchers is another way we can deck thin our deck assuming we can see those cards. Although we these 2 cards, the chances of searching those cards from the deck is very high. OP09 Nami works when attacking, not an on play effect, look at top 5 cards of your deck, reveal 1 blue Event and add it to your hand. Then, place the rest at the bottom of your deck in any order. There's good and bad point about this card, not being a on play effect means we can constantly search for Events and add them to our hand. The downside is that if Nami is rested, she will be the attack target. I doubt your opponents will let you comfortably add Events to your hand each time Nami attacks.
Apis is very useful as I've increased the number of East Blue cards in the deck, making the chance of searching East Blue cards very high. The effect works on play, you may trash 2 cards from your hand to look at top 5 cards of your deck, reveal 1 East Blue card and add it to your hand. Then, place the rest at the bottom of your deck in any order. The downside is that we loses 2 cards just to get 1 card, but I guess we can fill in Mellow requirement easily.
The Trigger Effects


Some of these Events I use as a discard fodder as I am mainly aiming toward the trigger effects over the main effect, except Snake Dance. Snake Dance will depends if I've got Kaya on the field or not, if I don't then discard fodder it is. Impel Down All Stars is for the trigger effect, if you draw this card in your hand, the effect will be useless and will need to be treated as a discard fodder for your effects. The trigger effect is draw 2 cards. Just like Sanji's Pilaf, you will need to be lucky with this trigger effect, although Sanji's Pilaf can be played from your hand unlike All Stars.
Desert Spada is a card I rarely use for the counter effect. Yes you can use the effect, but I mainly aim for the trigger effect. The counter effect is your Leader or 1 of your Characters gains 2k power this battle. Then, look at the top 3 cards of your deck and place them on top or bottom of the deck in any order. If you really need to know the top cards of your deck before you mill or draw, then feel free to use this effect. The trigger effect is draw 2 cards and trash 1 card from your hand. Of course triggering the trigger effect will be more beneficial than the counter effect.
Snake Dance can be a discard fodder if you don't want to discard the other cards in your hand. But if you have Kaya in play, then Snake Dance will be needed to reuse Kaya's on play effect. The counter effect is your Leader or 1 of your Characters gains 4k power the battle. Then, return 1 of your Characters to your hand. The others aren't worth returning to your hand unless you wanted to protect OP09 Nami from being attacked. The trigger effect is return 1 of your Characters to the owner's hand to return 1 of your opponent's 5 cost or less Characters to the owner's hand. Again if we can get lucky, the effect will be very useful to slow down your opponent's attacks as we need to stall as much as possible for this deck. Hopefully, you can also bounce Kaya to your hand.


No comments:
Post a Comment